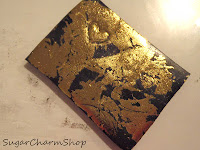
Testing out foil on polymer clay
In my first haul on this site I'd received a few packages, and one of the things I'd ordered was foil. I got the 'Lisa Pavelka' foil for polymer clay to try out since I've never used that kind of foil on my clay pieces before, but I figured it could create some nice effects for steampunk charms.

I no longer have the packaging, but I read the back which told you to use the foil on unbaked clay, using your finger to burnish and then sealing with a thin layer of liquid clay to protect it.
The foil sheet I used to experiment with is not the lisa pavelka sheets (later in the post I'll tell you which ones I used for the testing, but they work the same).

In this first picture I'd used my finger to quickly/lightly burnish the foil onto the clay. It worked well, it gave the clay an awesome metalic finish,.. but I hated how this didn't really give me much control as to where the foil was applied. To be fair, it would make an AWESOME background, both if you're covering the clay completely in the foil with no bare spots, or if you make a "cracked" effect like in my second picture by only applying the foil to sections of the clay.
I like knowing where the foil is going to be applied and I wanted to be able to make small patterns and other details, so I made a few experiments - which explains the dented heart shape you can see.
 My first test was a embossing tool that I used to burnish instead. Now, I was aware that this method maybe wouldn't work how I wanted it to - the foil uses heat to transfer, and the embossing tool is cold metal, but one thing I don't understad is why the foil seemed to stick to every other spot than the place I'd burnished...
Oh well, I had one more tool I needed to try out;
After receiving the Lisa Pavelka foil in the mail I bought a "hot stamping/caligraphy"-ish pen. The supermarket I work at gets a bunch of new items each week, and once they sell out we don't get a new batch in weeks, months or maybe even ever. So at the time my foil arrived in the mail we coincidentally had these pens in the store. They came with 20 (I think) small sheets of foil and are meant for decorating envelopes, gifts etc.. I decided to buy one, even if I wouldn't end up using the pen I'd still have 20 lovely sheets of foil! :)
I first tested out the pen on unbaked clay which gave me the same result as the embossing tool. Finally I decided to test the foil on baked clay - I used the back of one of my charms.
 With the embossing tool I was able to transfer a bit of foil but I wasn't able to make good looking patterns, so Iremoved it. However, the heated caligraphy pen worked really well on the baked clay! I was able to easily make swirls and dots. I guess you could heat up an embossing tool and then use it the same way but it would probably take a bit longer.
A good thing about using the foil on baked clay is that it won't make the same dents as if the clay is raw and soft. You'll still need to protect the foil with glaze or liquid clay (I recommend liquid clay because it's more resistant to wear and tear).
I'll definitely be using this foil on some steampunk pieces and other charms/miniatures in the future :)


No comments:
Post a Comment